
Have you ever struggled with stubborn weeds taking over your garden? A silage tarp might be the solution you need. These heavy-duty tarps block sunlight, stopping weeds in their tracks by cutting off photosynthesis. Studies even show that silage tarps can match the weed control of multiple tillage passes, saving you time and effort. Plus, they improve soil moisture and reduce erosion, making them a win-win for your garden. Whether you’re prepping for planting or tackling weed problems, silage tarps offer a simple, chemical-free way to get the job done.
Key Takeaways
Silage tarps stop sunlight, killing weeds without using chemicals. This is better for the environment and soil health.
These tarps help keep soil moist, which helps tiny soil organisms and stops soil from washing away.
Before using a tarp, clean up the area and make the soil flat for the best results.
Hold tarps in place with heavy objects so they don’t move and weeds stay covered.
Move tarps to different garden spots to keep soil healthy and get the most out of natural weed control.
Understanding Silage Tarps and Their Benefits

What Are Silage Tarps?
Silage tarps are heavy-duty plastic sheets designed for agricultural use. They’re primarily used to cover silage piles, but gardeners and farmers have discovered their incredible versatility. These tarps are made from durable materials like polyethylene or PVC, which makes them resistant to tearing and weather damage. Unlike regular tarps, silage tarps are specifically designed to block sunlight, creating a dark environment that’s perfect for weed control and soil preparation.
Here’s a quick comparison of common materials used to manufacture silage tarps:
Material Type | Advantages | Durability Impact |
|---|---|---|
Reinforced Polyethylene (RPE) | High tear resistance, UV stability | Best choice for long-term use |
Low Density Polyethylene (LDPE) | Flexible, decent UV resistance | Good, but less durable than RPE |
High Density Polyethylene (HDPE) | Strong, good chemical resistance | Better than LDPE, but not as good as RPE |
Polyvinyl Chloride (PVC) | Low cost, flexible | Short lifespan due to low UV resistance |
When choosing a silage tarp, consider your needs and how long you plan to use it. For long-term projects, RPE is your best bet.
Key Benefits of Silage Tarps
Effective Weed Suppression Without Chemicals
Silage tarps offer a chemical-free way to manage weeds. By blocking sunlight, they prevent photosynthesis, which eventually kills the weeds underneath. This method is not only safer for the environment but also helps you avoid chemical residues in your soil.
Improved Soil Moisture Retention and Structure
These tarps trap moisture in the soil, reducing evaporation. This creates a more stable environment for soil microbes, which are essential for healthy soil. However, be cautious—if the soil is already compacted, the tarp might worsen the issue.
Reduced Labor and Time for Soil Preparation
Using a silage tarp can save you hours of backbreaking work. Instead of manually removing weeds or tilling the soil, you can let the tarp do the heavy lifting. This is especially helpful when preparing a new garden space, as it simplifies the process.
How Silage Tarps Work
Blocking Sunlight to Kill Weeds
Silage tarps work through a process called occultation. By blocking sunlight, they stop weeds from growing and eventually kill them. Unlike solarization, which uses clear plastic to heat the soil, silage tarps can be used year-round, making them a versatile option for weed control.
Promoting Organic Matter Decomposition
When you place a silage tarp over a new garden space, it creates a warm, moist environment. This accelerates the decomposition of organic matter, enriching the soil with nutrients. It’s like giving your garden a head start before planting season.
Tip: Avoid leaving the tarp on for too long during hot months, as it might harm soil microbes.
By using silage tarps, you’re not just controlling weeds—you’re also improving your soil’s health and structure. It’s a win-win for any gardener or farmer.
Step-by-Step Guide to Using Silage Tarps
Preparing the Area for Tarping
Clearing Debris and Existing Vegetation
Before you start tarping, take some time to clear the area. Remove any large debris, such as rocks, branches, or leftover plant material. These can create bumps under the tarp, making it less effective. If there’s existing vegetation, mow it down as close to the ground as possible. This step ensures the tarp lies flat and blocks sunlight completely, which is crucial for effective weed control.
Tip: If you’re dealing with invasive perennial weeds like bermudagrass, clearing the area thoroughly is even more important. These weeds are persistent and need extra attention to prevent regrowth.
Leveling the Soil for Even Tarp Placement
Once the area is clear, level the soil. Uneven ground can cause gaps between the tarp and the soil, allowing light to seep through. Use a rake or shovel to smooth out any high spots or fill in low areas. This step not only improves the tarp’s effectiveness but also helps you prepare your beds for planting later.
Placing the Silage Tarp
Selecting the Right Size Tarp for Your Area
Choosing the right size silage tarp is key. Here’s what to consider:
Measure the area you want to cover.
Account for the stacking method if you’re covering bales.
Add at least four feet of overhang to ensure full coverage.
A properly sized tarp will make tarping easier and more effective.
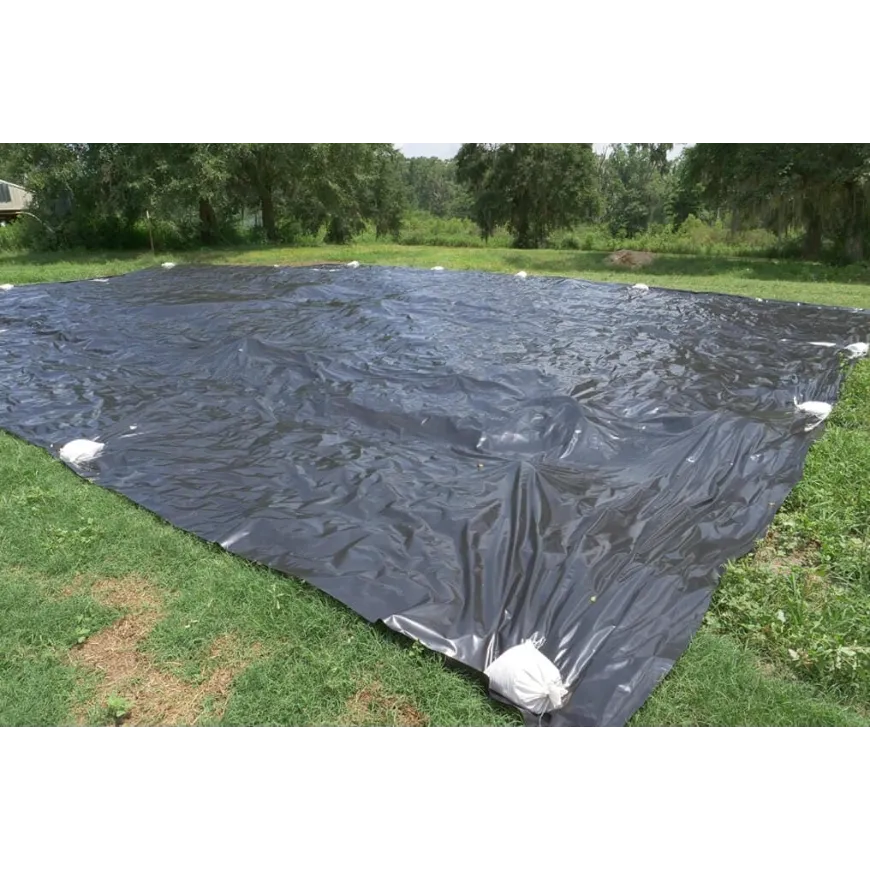
Anchoring the Tarp Securely with Weights
Once you’ve got the right tarp, it’s time to anchor it down. Use heavy materials like sandbags, rocks, or concrete blocks to secure the edges. Place weights every few feet to prevent the tarp from shifting in the wind. Make sure the edges are sealed tightly to block out light and reduce weed pressure.
Pro Tip: Avoid using sharp objects as weights. They can tear the tarp and reduce its lifespan.
Duration and Timing for Weed Control
Recommended Timeframes for Effective Weed Suppression
The amount of time you leave the tarp down depends on your goals. For general weed suppression, 2-8 weeks is usually enough to kill most weed seeds. If you’re working with new land or invasive perennial weeds, leave the tarp on for up to 12 weeks. Research from Roanoke, Virginia, shows that perennial weeds like bermudagrass may require 14-16 weeks for complete control.
Seasonal Considerations for Optimal Results
Timing matters when it comes to tarping. In cooler months, tarps take longer to warm the soil and kill weeds. For early spring planting, tarp during winter to create weed-free beds. In warmer climates, you can use tarps year-round for no-till weed control and bed prepping. Adjust your timing based on your local weather patterns to get the best results.
Removing and Storing the Tarp
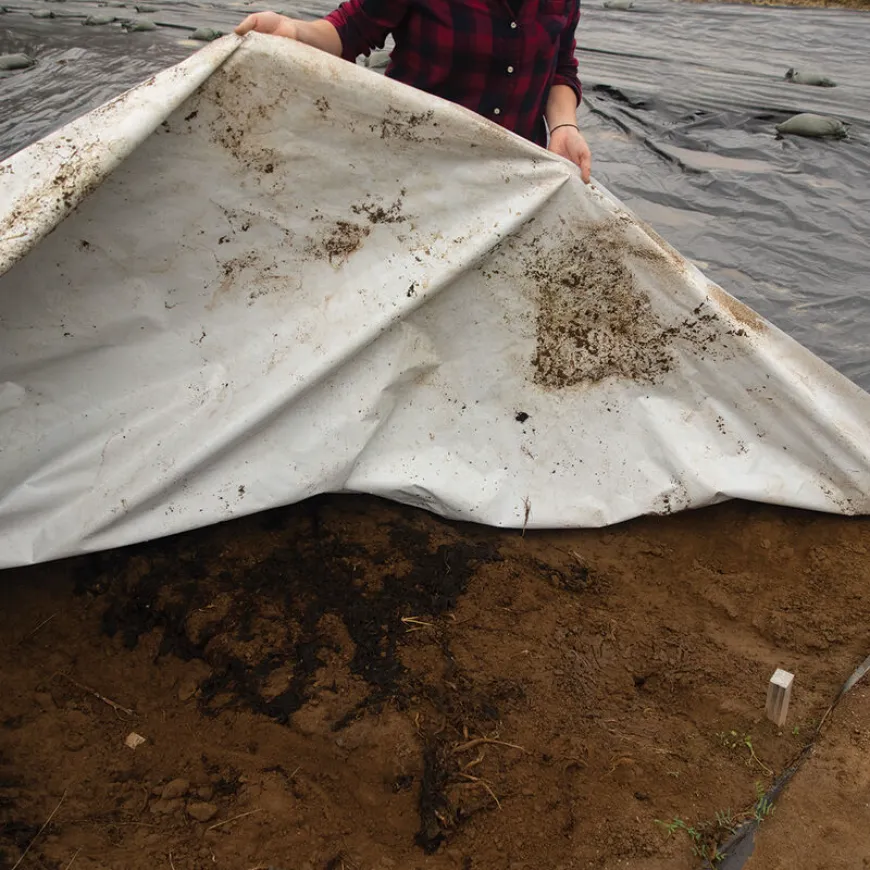
Checking Soil Readiness Before Removal
Before you remove the silage tarp, take a moment to check if the soil is ready. The goal is to ensure the weeds underneath are dead and the soil is in good condition for planting. Start by lifting a corner of the tarp and inspecting the area. If the weeds look brown and lifeless, the tarp has done its job. For invasive weeds, like bermudagrass, you might need to leave the tarp on longer to ensure they’re fully suppressed.
Touch the soil to check its moisture level. It should feel slightly damp but not overly wet. If it’s too dry, the tarp might have been left on for too long, especially in hot weather. On the other hand, if the soil feels soggy, give it some time to dry out before planting. This step helps you avoid compacting the soil when you start working on it.
Tip: If you notice any invasive weeds still clinging to life, remove them manually before planting. This prevents them from regrowing and taking over your garden.
Proper Cleaning and Storage for Reuse
Once the tarp has served its purpose, cleaning and storing it properly will extend its lifespan. Start by ensuring the tarp is completely dry. If it rained recently, use a broom to sweep off any puddles. Flip the tarp over to dry both sides thoroughly. Moisture left on the tarp can lead to mold or mildew during storage.
When the tarp is dry, fold it neatly. Bring the ends to the center, then fold it again until it’s a manageable size. This makes it easier to store and reuse. Choose a cool, dry place for storage. Keep the tarp off the ground to protect it from pests or rodents that might chew through it. A shelf or a storage bin works well for this purpose.
Note: Avoid storing the tarp in direct sunlight for long periods. Prolonged exposure can weaken the material and reduce its effectiveness.
By following these steps, you can make the most of your silage tarp technique. Proper care ensures your tarp will be ready to tackle invasive weeds and prepare your soil for many seasons to come.
Tips for Maximizing Weed Suppression and Soil Preparation
Anchoring Techniques
Using heavy materials like sandbags or concrete blocks
Keeping your silage tarp securely in place is crucial, especially in windy areas. You can use heavy materials like sandbags, cinder blocks, or large stones to anchor the tarp effectively. Place weights every 5-10 feet along the edges, focusing on corners and areas facing the wind. Sandbags are a popular choice because they’re easy to move and adjust. For long-term use, UV-treated sandbags are a durable option that can withstand outdoor conditions. If you prefer stones, aim for ones weighing at least 30 pounds to ensure they stay put during high winds.
Tip: Fill sandbags generously to prevent them from being blown away. A well-anchored tarp means better weed control and soil preparation.
Securing edges to prevent wind damage
Wind can wreak havoc on your tarp if the edges aren’t sealed properly. To prevent light from sneaking in and weeds from surviving, make sure the edges are tightly secured. Use overlapping folds or tuck the edges into shallow trenches. Adding extra weights along the perimeter can also help keep the tarp snug against the ground.
Seasonal and Climate Considerations
Using tarps in winter for early spring planting
Winter is the perfect time to use silage tarps if you’re planning for an early spring garden. By covering your soil during the colder months, you can suppress weeds and warm the soil for planting. The tarp traps heat and moisture, creating a microclimate that encourages organic matter to break down. When spring arrives, you’ll have a weed-free, nutrient-rich bed ready for planting.
Adjusting tarp use based on local weather patterns
Your local climate plays a big role in how you use silage tarps. In cooler regions, you might need to leave the tarp on longer to achieve effective weed control. In warmer climates, shorter durations can still yield great results. Keep an eye on rainfall, too. Excess water can pool on the tarp, so make sure it’s anchored well and has proper drainage.
Combining Silage Tarps with Other Practices
Adding compost or organic matter before tarping
For even better results, consider adding compost or organic matter to your soil before laying down the tarp. The tarp creates a moist environment that encourages worms to surface and break down the organic material. This process enriches the soil, making it fluffier and easier to work with. Plus, it minimizes soil disturbance, allowing beneficial microbes to thrive.
Rotating tarp use across different garden areas
To maximize the benefits of silage tarps, rotate their use across different parts of your garden. This practice helps maintain soil health and ensures that all areas receive the benefits of organic weed control. By moving the tarp around, you can prepare multiple beds over time without exhausting the soil in one spot.
Note: Combining silage tarps with composting not only improves soil fertility but also makes bed flipping a breeze. You’ll save time and effort while creating the perfect environment for your plants.
Overcoming Common Challenges with Silage Tarps

Managing Wind and Weather
Preventing tarp movement in windy conditions
Wind can make handling a silage tarp tricky, especially if you’re working alone. To keep the tarp in place, use heavy materials like cinder blocks, large rocks, or sandbags. Place these weights every 5-10 feet along the edges, focusing on the corners where wind pressure is strongest. For extra security, choose rocks weighing at least 30 pounds or fill sandbags generously to prevent them from shifting. If you’re working with a large tarp, having a few extra hands can make the process much easier.
Tip: Always check the weather forecast before laying down your tarp. Avoid starting the process on particularly windy days to save yourself the hassle.
Avoiding water pooling on the tarp surface
Heavy rainfall can cause water to collect on your tarp, which might lead to sagging or damage. To prevent this, consider creating a slight slope in the soil before placing the tarp. This helps water drain naturally. If pooling still occurs, gather a few people to help lift the tarp and direct the water to a low spot. For long-term solutions, raised beds can improve drainage and reduce pooling issues.
Note: Avoid poking holes in your tarp unless absolutely necessary. While it helps with drainage, it can reduce the tarp’s effectiveness for weed control.
Addressing Pest Issues
Identifying and mitigating pest problems under the tarp
Silage tarps create a dark, moist environment that can attract pests like voles and mice. After removing the tarp, inspect the area for signs of pest activity, such as burrows or chewed plant material. If you notice an increase in pests, consider using traps or natural deterrents to manage the problem. Keeping the surrounding area clean and free of debris can also discourage pests from settling in.
Preventing pest attraction during tarp use
To minimize pest attraction, avoid leaving food scraps or organic debris near the tarp. You can also mow the area around the tarp to reduce hiding spots for rodents. If pests persist, try rotating tarp placement to disrupt their habitat. This simple step can help keep your garden pest-free while still benefiting from the tarp’s weed control properties.
Scaling Up for Larger Areas
Efficiently managing multiple tarps
Covering larger plots with multiple silage tarps can feel overwhelming, but a little planning goes a long way. Start by dividing the area into manageable sections. Lay one tarp at a time, ensuring each is securely anchored before moving to the next. Using sandbags or rocks as weights makes it easier to adjust the tarps as needed. If possible, recruit a team to help with placement and anchoring.
Pro Tip: Label your tarps by size or location to streamline the process when reusing them in the future.
Strategies for covering extensive plots
For extensive plots, overlapping the edges of multiple tarps can provide seamless coverage. Make sure the overlaps are at least 12 inches wide to block sunlight effectively. If you’re dealing with uneven terrain, use additional weights to keep the tarps snug against the ground. Planning your layout in advance can save time and ensure every inch of your plot gets the benefits of weed control.
Reminder: Scaling up doesn’t mean sacrificing efficiency. With the right tools and techniques, you can manage large areas without extra stress.
Additional Uses for Silage Tarps Beyond Weed Control

Extending Growing Seasons
Warming soil in early spring
A silage tarp can help you get a head start on planting by warming the soil in early spring. When you lay the tarp over your garden beds, it traps heat and moisture, creating a cozy environment for the soil. This warmth encourages microbial activity and speeds up the breakdown of organic matter, making your soil nutrient-rich and ready for planting earlier than usual. If you’re eager to plant cool-season crops like lettuce or spinach, this method can give you a significant advantage.
Protecting soil from erosion during off-seasons
During the off-season, bare soil is vulnerable to erosion caused by wind and rain. Silage tarps act as a protective barrier, keeping your soil intact. They also help manage cover crops, which improve soil moisture retention and suppress weeds. The residue left behind by these cover crops strengthens the soil structure, reducing the risk of erosion. By using a tarp, you’re not just protecting your soil—you’re also preserving its fertility for future planting.
Composting and Organic Matter Breakdown
Accelerating composting with silage tarps
If you’re into composting, a silage tarp can speed up the process. Covering your compost pile with a tarp traps heat and moisture, creating the perfect conditions for decomposition. This method breaks down organic material faster, giving you nutrient-rich compost in less time. Plus, it keeps the pile neat and prevents it from drying out or being scattered by wind.
Creating weed-free mulch for planting
Silage tarps can also help you create weed-free mulch. By covering organic material like leaves or grass clippings, the tarp suppresses weeds while breaking down the material into a rich, crumbly mulch. This mulch can then be spread over your garden beds to retain moisture and add nutrients to the soil.
Preparing Fields for Crop Rotation
Enhancing soil fertility with tarp-assisted cover crops
Using silage tarps in your crop rotation plan can work wonders for soil fertility. By terminating cover crops with a tarp, you leave behind a layer of organic matter that enriches the soil. This method also improves soil moisture retention and reduces erosion, setting the stage for healthy crop growth.
Preparing clean planting beds for new crops
Silage tarps are excellent for preparing fields for new crops. They block sunlight, killing weeds and creating a stale seedbed. This process encourages weed seeds to germinate and then eliminates them, leaving you with a clean, weed-free bed. Studies show that this method rivals multiple tillage passes, saving you time and effort. If you prepare your fields in the fall, the tarp will create warmer, drier conditions by spring, making planting a breeze.
Pro Tip: Schedule tarps into your crop rotation plan to streamline transitions between crops and maintain soil health.
Silage tarps are a game-changer for gardeners and farmers. They simplify weed control, improve soil health, and save you time. By using them regularly, you’ll notice long-term benefits like healthier soil and better harvests. These tarps encourage worms to surface and break down organic matter, creating natural compost. This process leaves you with a fertile, weed-free planting area that’s perfect for growing vegetables. Plus, minimal soil disturbance helps beneficial microbes thrive, leading to nutrient-rich food.
Incorporating a silage tarp into your routine boosts efficiency and reduces weed pressure. This means less time spent on maintenance and more time enjoying a productive garden. Whether you’re a beginner or an experienced grower, silage tarps can transform your approach to soil preparation and weed management.
FAQ
How long should I leave a silage tarp on the soil?
For most weeds, 2-8 weeks works well. If you’re dealing with stubborn perennials, leave it on for up to 12 weeks. Timing depends on your goals and local weather. Check the soil and weeds periodically to decide when to remove it.
Tip: Cooler months may require longer tarping periods for effective results.
Can I use silage tarps on uneven ground?
Yes, but you’ll need to level the soil as much as possible first. Uneven ground can let light through, reducing the tarp’s effectiveness. Use a rake or shovel to smooth out bumps and fill low spots before placing the tarp.
Do silage tarps harm soil microbes?
No, silage tarps actually help soil microbes thrive by creating a moist, warm environment. However, leaving the tarp on too long during hot weather might harm some microbes. Check the soil regularly to ensure it’s in good condition.
What’s the best way to store silage tarps?
Dry the tarp completely before folding it neatly. Store it in a cool, dry place, away from direct sunlight. Use a shelf or bin to keep it off the ground and protect it from pests. Proper storage extends its lifespan.
Note: Avoid storing wet tarps to prevent mold or mildew.
Can I use silage tarps year-round?
Absolutely! Silage tarps work in all seasons. Use them in winter to prepare for spring planting or during summer to suppress weeds. Adjust the duration based on your local climate and the type of weeds you’re targeting.
Pro Tip: Rotate tarp use across garden areas for maximum efficiency.
See Also
Evaluating UPQUARK Marine Absorbents for Oil Spill Response
Utilizing Oil Absorbent Socks: Practical Uses and Benefits