
Roof damage can happen unexpectedly, leaving your home vulnerable to the elements. Roof tarp installation is a quick and effective way to minimize water damage and protect your home until permanent repairs can be made. Ignoring roof issues can lead to serious problems like mold growth, structural damage, or even electrical hazards. By taking action to cover the damaged part with a tarp, you can avoid costly repairs and keep your home safe. This guide will help you with roof tarp installation, ensuring your emergency roof repairs are both safe and effective.
Key Takeaways
Check roof damage carefully. Wait for dry weather and use a strong ladder. Wear shoes that grip well to avoid slipping.
Collect needed tools and supplies first. You’ll need a tarp, nails, a hammer, and a measuring tape to do the job right.
Attach the tarp firmly to stop leaks. Use wooden boards and nails to hold it down, making sure it covers past the damaged spot.
Assessing the Roof Damage

Inspecting the Roof for Safety
Before you start, safety should be your top priority. Damaged roofs can be unstable, so take precautions to avoid accidents. Always wait until the storm has passed and the roof is dry. Use a sturdy ladder and set it up on firm, level ground. Make sure all locks are engaged, and follow the four-to-one rule for ladder placement. If you need to climb onto the roof, wear shoes with good traction and consider using a safety harness. Avoid walking on the roof unless absolutely necessary. These steps will help you stay safe while assessing the damage.
Taking Photos for Documentation
Once you’re sure it’s safe, grab your phone or camera and document the damage. Take clear photos of the affected areas from multiple angles. Focus on visible exterior damage like missing or curling shingles. Don’t forget to check inside your home for water stains or leaks on ceilings and walls. These photos will not only help you understand the extent of the damage but also serve as evidence for insurance claims.
Clearing Debris from the Damaged Area
Before you install a roof tarp, clear away any debris from the damaged roof. Remove branches, leaves, or other objects that might interfere with the tarp. Be cautious while doing this to avoid further damage. If the debris is heavy or hard to reach, ask for help or use tools like a rake or broom. A clean surface ensures the tarp will fit securely and protect your home effectively.
Tip: Clearing debris also helps you spot hidden issues like sagging areas or poor drainage that might need attention later.
Tools and Materials for Roof Tarp Installation
Before you start the process of roof tarp installation, gathering the right tools and materials is essential. Having everything ready will save you time and ensure the job is done safely and effectively.
Essential Tools
You’ll need a few basic tools to install a roof tarp securely. Here’s a quick list:
Ladder: A sturdy ladder is crucial for safe access to your roof. Make sure it’s tall enough to reach the damaged area.
Hammer or Drill: These are necessary for driving nails or screws into place.
Utility Knife: Use this to cut the tarp to the right size.
Measuring Tape: This helps you measure the damaged area accurately.
Each tool plays a vital role in making the process smooth and efficient. For example, a hammer or drill ensures the tarp stays firmly in place, while a utility knife allows you to customize the tarp’s size.
Materials Needed
Choosing the right materials is just as important as having the right tools. Here’s what you’ll need:
Tarp: Opt for a heavy-duty, waterproof tarp made of polyethylene or vinyl. It should be large enough to cover the damaged area and extend at least three feet beyond it.
Roofing Nails or Screws: These secure the tarp to the roof.
2×4 Wooden Boards: Use these to anchor the edges of the tarp for added stability.
A durable tarp is key to protecting your roof from water damage. Look for one that’s UV-resistant and at least 10 mils thick for better longevity.
Optional Safety Gear
Safety should always come first when working on a roof. Consider using these items:
Gloves: Protect your hands from sharp edges and debris.
Non-Slip Shoes: These provide better traction on the roof.
Safety Harness: This is especially useful if your roof is steep or high.
Tip: Investing in safety gear can prevent accidents and make the job less stressful. Even if you feel confident, it’s better to be cautious when working at heights.
By preparing these tools and materials ahead of time, you’ll be ready to tackle the next step: unrolling and positioning the tarp.
Unrolling and Positioning the Tarp

Measuring the Damaged Area
Before you start unrolling the tarp, take a moment to measure the damaged area carefully. This step ensures you’ll have the right size tarp to cover the roof effectively. Follow these steps:
Identify the damaged section of your roof.
Use a tape measure to record the length and width of the affected area.
Add 4–6 feet of extra coverage on all sides to account for overlap and secure fastening.
Choose a tarp that’s large enough to extend beyond the damage.
Tip: Always double-check your measurements. A tarp that’s too small won’t provide adequate protection, while one that’s too large can be difficult to handle.
Cutting the Tarp to Fit
Once you’ve measured the area, it’s time to cut the tarp to the right size. Lay the tarp flat on the ground and use a utility knife to trim it. Make sure to leave enough excess material for securing it properly. Avoid common mistakes like cutting the tarp too small or using a tarp that isn’t weather-resistant. A poorly cut tarp can lead to leaks or even blow away during storms.
Note: If you’re unsure about cutting, it’s better to leave the tarp slightly larger than needed. You can always fold the edges under when securing it.
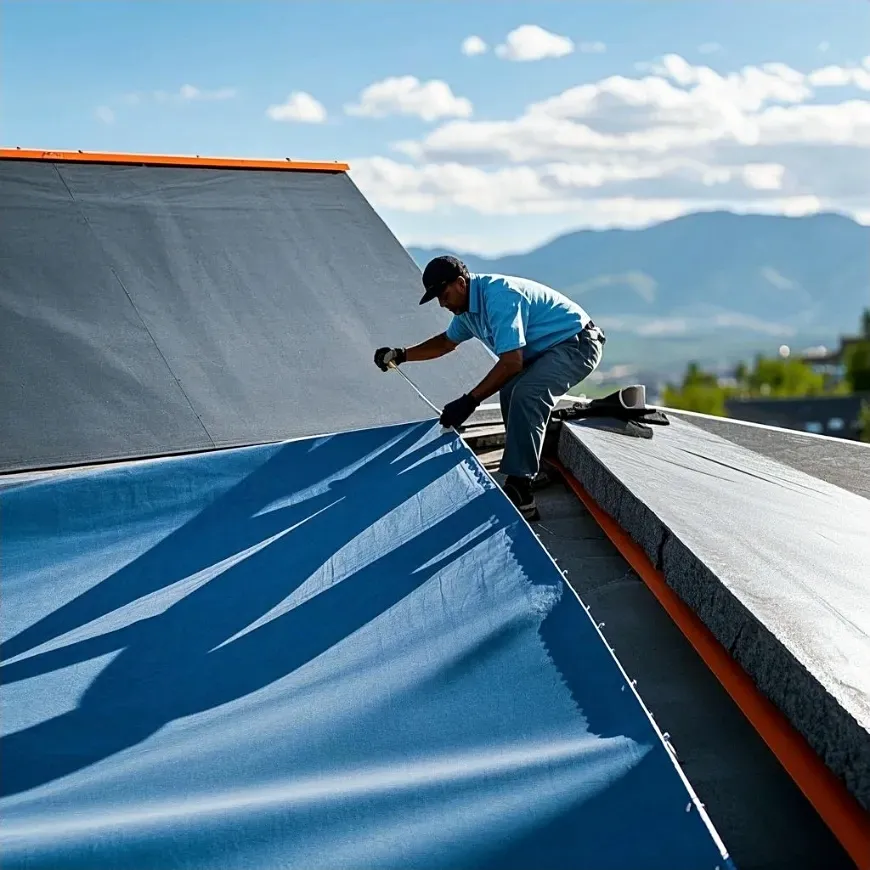
Positioning the Tarp Over the Roof
Now comes the tricky part—placing the tarp over the damaged area. Start by unrolling the tarp and draping it evenly over the roof. Make sure it extends at least three feet beyond the damage in all directions. Secure the tarp temporarily with heavy objects like bricks or tarp straps to keep it in place while you work.
For added stability, use wood strips along the edges of the tarp. Nail or screw these strips through the tarp’s grommets into the roof. Pay close attention to the corners and edges, as these areas are more prone to lifting during high winds. Stretch the tarp tight to avoid wrinkles or flaps that could let water in.
Pro Tip: Position the tarp so that water flows off the roof naturally. This prevents pooling, which can cause further damage.
How to Attach a Tarp Securely

Anchoring the Tarp with Wooden Boards
To secure the tarp effectively, wooden boards are your best friend. Start by laying 2×4 boards along the edges of the tarp. Wrap the excess tarp material around each board and nail or staple it in place. This creates a strong anchor that keeps the tarp from shifting. For extra stability, cut small holes at the corners of the tarp and thread a durable rope through them. Tie the ropes securely to the boards or other sturdy points.
If you want even more reinforcement, lay additional 2×4 boards perpendicular to the first set. Screw these into place to create a grid-like structure. This method ensures the tarp stays put, even in windy conditions. Always inspect your work to confirm there are no loose ends or unsecured areas.
Tip: Use cap nails to attach boards under the overhang of the tarp for added protection against wind.
Securing the Boards with Nails or Screws
When it comes to fastening the boards, nails and screws are your go-to options. Eye lag screws are particularly effective because they secure the tarp through its grommets, preventing it from blowing off. Aluminum angles with Tek screws are another great choice. These clamp the tarp tightly to the roof structure, ensuring a firm hold.
Space your screws or nails evenly, about every two feet, to distribute the tension. This prevents the tarp from tearing under pressure. Always aim to attach the fasteners into solid areas of the roof to avoid causing further damage.
Ensuring a Tight and Secure Fit
A tight fit is crucial for keeping your roof protected. Pull the tarp edges taut to eliminate slack or loose areas. Secure the edges by nailing them down to the roof or using sturdy anchor points like adhesive roof patches. Place anchors at each corner and along the edges for maximum stability.
To prevent water pooling, make sure the tarp is stretched tightly over the roof. Use ropes or bungee cords to tie it down securely. Check for any dips or wrinkles and adjust as needed. A well-fitted tarp not only protects your home but also lasts longer during harsh weather.
Pro Tip: Always double-check your work to ensure the tarp is firmly in place before leaving the roof.
Safety Tips for Installing a Roof Tarp
Using Proper Safety Equipment
When working on a roof, safety equipment is your best defense against accidents. Always wear a safety harness to prevent falls, especially if your roof is steep or high. Non-slip shoes are another must-have, as they provide better traction on slippery surfaces. Gloves can protect your hands from sharp edges and debris while you work.
Before starting, inspect the roof for loose shingles or unstable areas. These hazards can make the installation process risky. Cleaning the surface and identifying potential dangers will help you stay safe and ensure a smoother installation.
Tip: Keep your tools within easy reach to avoid unnecessary movement on the roof. A tool belt or bucket can make this easier.
Avoiding Installation During Bad Weather
Bad weather can turn roof tarp installation into a dangerous task. Wind, rain, or snow can make the roof slippery and increase the risk of accidents. Always wait for clear skies before starting the job.
Installing the tarp at an angle is also important. This prevents water from pooling and reduces the chances of leaks. Regularly check for debris that might block water runoff. A well-angled tarp not only protects your home but also lasts longer.
Reminder: If a storm is approaching, focus on securing the tarp to your roof quickly but safely. Never rush the process at the expense of your well-being.
Working with a Partner for Assistance
Roof tarp installation is much easier and safer when you have a partner. They can hold the ladder steady, pass you tools, or help position the tarp. This teamwork reduces the risk of accidents and speeds up the process.
If possible, consider hiring professionals. They can ensure the tarp covers all vulnerable areas and is installed correctly. Their expertise allows them to spot hidden issues, saving you from costly repairs later. In storm-prone areas, timely and efficient installation can prevent significant damage to your property.
Pro Tip: Even if you’re confident in your skills, having someone assist you can make the job less stressful and more efficient.
Installing a roof tarp involves a few essential steps:
Assess the damage.
Lay down the tarp.
Secure it tightly.
Check for gaps.
Secure the overhang.
Remember, this is only a temporary fix. Professionals can assess the damage, ensure proper repairs, and help you plan for the future. Don’t hesitate to reach out for expert help!
FAQ
How long can a roof tarp stay in place?
A roof tarp can last up to 90 days. However, you should schedule permanent repairs as soon as possible to avoid further damage.
Can I install a roof tarp without professional help?
Yes, you can. Follow this guide carefully, use proper safety gear, and work with a partner to ensure a secure and safe installation.
How to tarp a roof safely?
First, ensure you have a stable ladder. Wear non – slip shoes and a safety harness if possible. Work with a partner to hand up materials and keep an eye on each other. Avoid working during windy or wet conditions.
What are the best methods for securing the tarp to your roof?
You can use roofing nails or screws along with fender washers to prevent the tarp from tearing. Another option is to attach the tarp to the roof using a construction adhesive, but this should be done carefully to avoid damaging the roof. For added stability, especially in windy conditions, you can use ropes or bungee cords tied to sturdy parts of the roof structure.
What type of tarp works best for roof repairs?
Heavy-duty, waterproof tarps made of polyethylene or vinyl are ideal. Look for UV-resistant options that are at least 10 mils thick for durability.
Tip: Always choose a tarp larger than the damaged area to ensure full coverage and secure fastening.
See Also
Your Ultimate Resource for Oil-Only Absorbent Pillows
Helpful Tips for Users of Oil-Only Absorbent Socks