
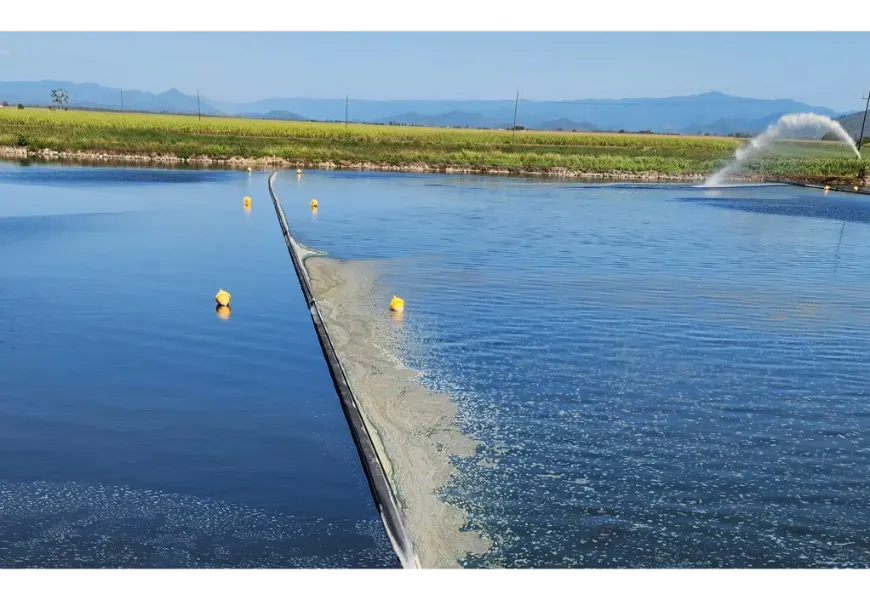
A floating baffle curtain is a specialized barrier designed to control water flow and improve efficiency in water management systems. You’ll often see it used in reservoirs, wastewater lagoons, or even construction sites to manage sediment and debris. These curtains prevent short-circuiting, promote better mixing, and increase retention time, which helps achieve higher water quality standards. Proper installation and maintenance are critical. Without them, issues like misalignment or damage can reduce effectiveness, whether you’re using it as a turbidity barrier or for other purposes.
Key Takeaways
Check the water before starting. Look at currents, depth, and trash to pick the right materials and anchors.
Pick the best curtain material for your project. PVC works for short use, but stronger fabrics last longer.
Get all tools and safety gear ready first. You’ll need anchors, ropes, floats, and safety equipment to work safely.
Check and fix your curtain often. Watch for damage, clean off trash, and tighten anchors to keep it working well.
Solve problems early. Add more anchors for strong currents and use blockers to stop trash from hurting your curtain.
Pre-Installation Preparations

Before you dive into the process of installing a floating baffle curtain, it’s essential to prepare thoroughly. Proper preparation ensures smooth installation and long-term effectiveness.
Site Assessment
Evaluating water conditions (currents, depth, debris)
Start by examining the water conditions at your site. Is the water calm, or are there strong currents? Measure the depth and check for debris that could interfere with the curtain. These factors help you decide on the right materials and anchoring system. For example, strong currents may require additional anchors, while shallow waters might need shorter curtains.
Determining the purpose of the curtain (sediment control, debris management)
What’s your goal? If you’re aiming for sediment control, you’ll need a curtain designed for effective turbidity control. For debris management, focus on durability and resistance to wear. Knowing the purpose ensures you choose the right configuration for your needs.
Choosing the Right Floating Baffle Curtain
Material options (PVC, reinforced fabrics)
Selecting the right material is crucial. Consider factors like chemical composition of the water, UV exposure, and temperature range. Here’s a quick breakdown of common materials:
PVC: Lightweight and easy to install but can degrade under UV exposure. It’s great for short-term projects.
Reinforced fabrics: Highly durable and resistant to chemicals and UV rays. These are ideal for long-term use but may be heavier.
Think about hydraulic flows and wind forces too. If your site faces harsh conditions, opt for thicker materials that resist damage.
Selecting the correct size and configuration
Size matters! Measure the area where you’ll install the curtain. Ensure it’s long enough to cover the required span and deep enough to reach the desired depth. For configurations, modular sections work well for flexibility, while continuous designs suit fixed installations.
Tools and Equipment for Curtain Installation
Essential tools (anchors, ropes, floats, stainless steel cables)
Gather the right tools to make your turbidity curtain installation hassle-free. You’ll need anchors to secure the curtain, ropes for adjustments, and floats to keep it buoyant. Stainless steel cables are perfect for added strength and durability.
Safety gear and precautions
Don’t forget safety! Equip yourself with gloves, life vests, and sturdy footwear. Always inspect your tools before starting. If you’re working in deep or fast-moving water, consider having a safety team on standby.
Tip: Double-check your equipment list before heading to the site. Missing tools can delay your curtain installation.
Step-by-Step Curtain Installation

Preparing the Curtain
Unpacking and inspecting for damage
When your floating baffle curtain arrives, the first thing you should do is unpack it carefully. Look for any signs of damage, such as tears, punctures, or missing components. Even minor issues can affect performance, so don’t skip this step. If you notice any defects, contact the supplier immediately for replacements or repairs.
Organizing components for easy access
Once you’ve inspected the curtain, lay out all the parts in a clean, flat area. Group similar items together—floats in one pile, weights in another, and so on. This organization will save you time during assembly and ensure you don’t misplace anything. Keep your tools and safety gear nearby for quick access.
Tip: Use a checklist to confirm you have all the required components before moving on to assembly.
Assembling the Curtain
Attaching floats, weights, and connecting sections
Start by attaching the floats to the top edge of the curtain. These keep the curtain buoyant and stable on the water’s surface. Next, secure the weights along the bottom edge to ensure the curtain stays vertical. If your curtain comes in sections, connect them using the provided fasteners or cables. Make sure each connection is tight to prevent gaps.
Ensuring proper alignment of components
Alignment is crucial for effective turbidity curtain installation. Use a measuring tape or laser level to check that the floats and weights are evenly spaced. Misaligned components can cause the curtain to sag or drift, reducing its effectiveness. Take your time here—it’s better to get it right now than to fix issues later.
Proper alignment often requires careful planning and precise measurements. A laser level survey can help identify potential problems before deployment.
Deploying and Anchoring
Positioning the curtain in the water
Now it’s time for deployment. Gradually lower the curtain into the water, starting from one end and working your way to the other. Avoid rushing this step to maintain control and prevent the curtain from drifting. Position it according to your site plan, ensuring it covers the target area completely.
Securing anchors and adjusting tension
Anchoring is the backbone of a stable silt curtain installation. Use steel posts set in concrete footings or Danforth-style anchors, depending on your site conditions. Attach the curtain to the anchors and adjust the tension to keep it taut but not overly tight. Allow some slack to accommodate water movement and tidal changes.
Installing intermediate anchors for stability
For larger installations, intermediate anchors are essential. Place these at regular intervals—typically every 100 feet—to prevent the curtain from sagging or shifting. Use lateral wind anchors if your site experiences strong winds. These additional anchors will keep the curtain stable and effective, even in challenging conditions.
Note: Gradual deployment and section anchoring are key to maintaining control and ensuring long-term stability.
Maintenance and Monitoring of Floating Baffle Curtains
Proper maintenance and routine monitoring are essential to keep your floating baffle curtain functioning effectively over time. Let’s break down what you need to do to ensure long-term performance.
Routine Inspections
Checking for wear, tear, and anchor stability
You should inspect your silt curtain regularly. Look for signs of wear, such as frayed edges, tears, or punctures. Pay close attention to the anchoring system. Loose or unstable anchors can cause the curtain to drift or sag, reducing its effectiveness. Tighten or replace any anchors that seem compromised.
Monitoring alignment and tension
Alignment is just as important as stability. Check if the curtain is still positioned correctly and if the tension is consistent. Misalignment or slack can allow debris or sediment to bypass the barrier. Adjust the tension or reposition the curtain as needed to maintain its efficiency.
Cleaning and Repairs
Removing debris and buildup
Debris buildup can weigh down your turbidity curtain and reduce its buoyancy. Clear away any accumulated debris during your inspections. Use a soft brush or hose to clean off dirt and algae. Keeping the curtain clean will extend its lifespan and improve its performance.
Fixing minor damage and replacing worn components
Small tears or holes can quickly become bigger problems if left unchecked. Patch minor damage using repair kits provided by the manufacturer. Replace worn-out floats, weights, or cables to keep the curtain in top shape. Regular repairs will save you from costly replacements down the line.
Long-Term Maintenance Tips
Adjusting cables and anchors as needed
Water levels and currents can change over time. Adjust the cables and anchoring system to accommodate these shifts. This will prevent unnecessary strain on the curtain and ensure it stays in place.
Ensuring durability through proper care
Store your silt curtain properly when not in use. Keep it dry and away from direct sunlight to prevent material degradation. Follow the manufacturer’s guidelines for long-term care to maximize durability.
Pro Tip: Schedule routine monitoring and maintenance every few weeks. This habit will help you catch issues early and keep your curtain installation running smoothly.
Addressing Common Challenges in Curtain Installation
Even with proper planning, you might face challenges during silt curtain installation. Let’s tackle some common issues and how to handle them effectively.
Managing Strong Currents
Using additional anchors for stability
Strong currents can push your silt curtain out of position, reducing its effectiveness. To counter this, you’ll need extra anchoring techniques. Here’s a quick guide to some options:
Technique | Description |
|---|---|
Cables installed at intervals with concrete anchors to limit baffle movement due to wind. | |
Ballast Chains | Continuous galvanized chain at the bottom of the baffle to provide stability and prevent corrosion. |
Adding these to your setup will keep your floating baffle curtain stable, even in challenging conditions.
Adjusting the curtain’s position to reduce strain
If currents are particularly strong, repositioning the curtain can help. Place it at an angle to the flow instead of directly across it. This reduces the strain on the curtain and prevents damage to the anchoring system.
Tip: Always monitor the current strength before and after deployment to ensure your adjustments are effective.
Handling Debris Accumulation
Regularly clearing debris to prevent damage
Debris can weigh down your silt curtain, causing it to sag or lose buoyancy. Make it a habit to clear debris during routine inspections. Use a rake or net to remove floating debris and prevent buildup.
Installing debris deflectors if necessary
For areas with heavy debris, consider installing debris deflectors. These barriers redirect debris away from the turbidity curtain, reducing wear and tear. They’re especially useful in rivers or construction sites with high debris flow.
Pro Tip: Combine regular cleaning with deflectors for maximum protection and longevity.
Adapting to Fluctuating Water Levels
Adjusting anchor lines to accommodate changes
Fluctuating water levels, caused by tides or unexpected changes, can destabilize your silt curtain. Leave some slack in the anchor lines during installation. This allows the curtain to move with the water levels, reducing strain and maintaining its position.
Using flexible materials for better adaptability
Choosing the right materials can make a big difference. Flexible options like XR-5 or HDPE fabrics adapt well to changing conditions. These materials resist UV rays, chemicals, and extreme temperatures, making them ideal for long-term use. When selecting materials, consider:
The expected lifespan of the curtain.
Site-specific conditions like hydraulic flow strength.
Note: Flexible materials ensure your silt curtain remains effective, even in unpredictable environments.
By addressing these challenges proactively, you’ll ensure your curtain installation stays effective and durable over time.
Installing a floating baffle curtain doesn’t have to be complicated if you follow the right steps. Start by choosing materials that match your site’s conditions, like UV-resistant fabrics for sunny areas or durable options for freezing temperatures. Regular inspections and cleaning keep your curtain in top shape. Don’t forget to adjust anchors and cables as water levels change. These small efforts improve water flow, reduce short-circuiting, and enhance system performance. By staying proactive, you’ll ensure your curtain lasts longer and works effectively.
Tip: Consistent care saves you time and money in the long run!
FAQ
What is the lifespan of a floating baffle curtain?
The lifespan depends on the material and conditions. High-quality reinforced fabrics can last 5–10 years with proper care. Regular cleaning and inspections help extend durability.
Tip: Store your curtain properly when not in use to prevent premature wear.
Can I install a floating baffle curtain without professional help?
Yes, you can! Follow the manufacturer’s instructions and this guide for a smooth process. However, for large or complex installations, hiring professionals ensures better results.
Note: Always prioritize safety, especially in deep or fast-moving water.
How do I choose the right material for my curtain?
Consider your site’s conditions. For short-term projects, PVC works well. For long-term use, reinforced fabrics resist UV rays, chemicals, and extreme temperatures. Match the material to your water’s chemical composition and environmental factors.
What should I do if my curtain sags or drifts?
Check the anchors and tension. Tighten loose anchors and adjust the tension to keep the curtain taut. If the issue persists, add intermediate anchors or reposition the curtain to reduce strain.
How often should I inspect my floating baffle curtain?
Inspect it every few weeks or after severe weather. Look for tears, debris buildup, and anchor stability. Regular checks help you catch small issues before they become big problems.
Pro Tip: Create a maintenance schedule to stay consistent with inspections.
See Also
Your Ultimate Resource for Oil-Only Absorbent Pillows
Helpful Guidelines for Users of Oil Only Absorbent Socks